Welcome to the Australian Ford Forums forum.

You are currently viewing our boards as a guest which gives you limited access to view most discussions and inserts advertising. By joining our free community you will have access to post topics, communicate privately with other members, respond to polls, upload content and access many other special features without post based advertising banners. Registration is simple and absolutely free so please, join our community today!

If you have any problems with the registration process or your account login, please contact us.

Please Note: All new registrations go through a manual approval queue to keep spammers out. This is checked twice each day so there will be a delay before your registration is activated.

Go Back   Australian Ford Forums > Club and Speciality Forums > Forum Community Car Clubs > AU Falcon.com.au

Reply
 
Thread Tools Display Modes
Old 18-06-2007, 12:45 AM   #1
robbo_yobbo
Kick out tha Jams
 
robbo_yobbo's Avatar
 
Join Date: Mar 2006
Location: SA
Posts: 443
Question attatch a Fiberglass bulge to a Steel Bonnet??

Hey all,
Ive seen a few final result pics on the forums of it being done before, but was just after a bit of detail of how it was actualy done.

I bought a Fiberglass bulge from ebay and it looks like this


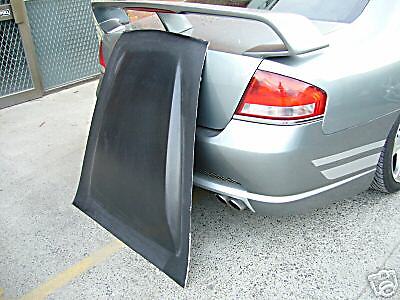
First thing I need to know is if the fiberglass surrounding the bulge needs to be cut out, or if I should leave it there to give it more surface area to adheer to the bonnet. I want it to sit flush but dont see how this can realy be done effectiveley without cutting it out?

Second thing is should it be put over bare steel, or should the bonnet be left painted to avoid rust and just scuffed back ?

3rd - How do I actualy attatch it??? some kind of glue or resin??? what will hold fiberglass to steel/paint, or do I pop rivet it???

If anyone has any instructions, Id be most appreaciative to hear them, as I dont want it flying off my bonnet because the glue didnt hold in a couple of weeks! Thanks.

__________________
$416.80.......All that cash came from a new (used) car. Check your back seats!
robbo_yobbo is offline   Reply With Quote Multi-Quote with this Post
Old 18-06-2007, 07:08 AM   #2
Soundwarp
Blue to the bone!
 
Soundwarp's Avatar
 
Join Date: Jun 2005
Location: Sunshine Coast
Posts: 490
Default

Wow, i'd be right down to a pannel beater........
__________________
BA GT-P in the garage


http://img.photobucket.com/albums/v7...dwarp/fbar.jpg
Soundwarp is offline   Reply With Quote Multi-Quote with this Post
Old 18-06-2007, 09:17 AM   #3
robbo_yobbo
Kick out tha Jams
 
robbo_yobbo's Avatar
 
Join Date: Mar 2006
Location: SA
Posts: 443
Default

theres bo fun in handing half a ton over to a pannel beater though
__________________
$416.80.......All that cash came from a new (used) car. Check your back seats!
robbo_yobbo is offline   Reply With Quote Multi-Quote with this Post
Old 18-06-2007, 10:20 AM   #4
svo347
AFF's 1st DM.......
 
svo347's Avatar
 
Join Date: Dec 2004
Location: Wha???... There is only 2 states 2 be in.. WA or Drunk..
Posts: 6,200
Default

Sikaflex will do the job mate, pretty much what they all use nowdays.
Before you glue it tho, leave it on the bonnet out in the sun to heat up and *Properly* conform to the bonnet contours.. Youll be happy you did!!!
__________________
FORD GIVING POWER TO THE PEOPLE
Alloy headed 347ci EDXR8
13.21 @107.7mph
Quote:
Originally Posted by zetec
I know what lengths they go to to ensure it's more than just a Ford sticker on the part. Ford doesn't throw it's name on anything for a quick buck.
06 Turbo Terri AWD 6 sp in Neo with stuff i didnt even need, side steps,15.2 inch roof mounted DVD,Pioneer $tezza,Selby 30/18mm swaybars,debunged,100 cpsi Ballistic cat,Plazmaman under battery Cai injectors 14/lb boost,ZF tuned,Xtreme's magic. :
svo347 is offline   Reply With Quote Multi-Quote with this Post
Old 19-06-2007, 01:28 AM   #5
robbo_yobbo
Kick out tha Jams
 
robbo_yobbo's Avatar
 
Join Date: Mar 2006
Location: SA
Posts: 443
Default

cheers mate, hopefully the weather warms up a bit then!
__________________
$416.80.......All that cash came from a new (used) car. Check your back seats!
robbo_yobbo is offline   Reply With Quote Multi-Quote with this Post
Old 19-06-2007, 01:50 AM   #6
DOC
FF.Com.Au Hardcore
 
DOC's Avatar
 
Join Date: Apr 2005
Posts: 4,409
Default

For that to sit flush you would have to chop some of the top metal out or maybe build some sort of intrenal frame for the cut out bulge to stick to, i think it was rmyers ? in e series who fitted up a bulge and was one of the best jobs i have seen, perhaps try and dig that thread up. will be interested to see how it pans out as looking at doing similar work

Last edited by DOC; 19-06-2007 at 01:58 AM.
DOC is offline   Reply With Quote Multi-Quote with this Post
Old 19-06-2007, 03:19 AM   #7
FGII-XR6
FF.Com.Au Hardcore
 
FGII-XR6's Avatar
 
Join Date: Aug 2006
Location: Salamander Bay
Posts: 5,427
Default

Quote:
Originally Posted by svo347
Sikaflex will do the job mate, pretty much what they all use nowdays.
Before you glue it tho, leave it on the bonnet out in the sun to heat up and *Properly* conform to the bonnet contours.. Youll be happy you did!!!
if it's fibreglass the sun won't make it bend to shape sorry for the chemistry lesson but i thought it best to explain why you cant reform the shape of fiberglass. There are 2 main types of plastic thhermoplastic and thermosetting plastic. Thermoplastic can be moulded with heat and even melted over and over again where thermosetting plastic is shaped and then cured in some cases with heat but in the case of the epoxy used in fibreglass by a chemical reaction. once cured heat will not change the shape significantly you can cut it or break it but you can't reform it. it is for this reason that OEM bumpers are not made of fiberglass they are made of a thermoplastic which can be welded and reformed after a collision this makes them vastly superior to the fiberglass bars you can get. one decent knock and they're stuffed i recently dinged my front bar and poped it back into shape
FGII-XR6 is offline   Reply With Quote Multi-Quote with this Post
Old 19-06-2007, 08:57 AM   #8
Hibbz
The Mod Bug Has Hit
 
Hibbz's Avatar
 
Join Date: Jan 2006
Location: Geelong
Posts: 241
Default

Quote:
Originally Posted by au3xr6
if it's fibreglass the sun won't make it bend to shape sorry for the chemistry lesson but i thought it best to explain why you cant reform the shape of fiberglass. There are 2 main types of plastic thhermoplastic and thermosetting plastic. Thermoplastic can be moulded with heat and even melted over and over again where thermosetting plastic is shaped and then cured in some cases with heat but in the case of the epoxy used in fibreglass by a chemical reaction. once cured heat will not change the shape significantly you can cut it or break it but you can't reform it. it is for this reason that OEM bumpers are not made of fiberglass they are made of a thermoplastic which can be welded and reformed after a collision this makes them vastly superior to the fiberglass bars you can get. one decent knock and they're stuffed i recently dinged my front bar and poped it back into shape
Im not sure about that because when i fitted my bodykit the rear bar flared out on one side by about 100mm so i got me old man to heat it up and i pushed it back to were i wanted it then held it while my dad cooled it with some water. It worked perfectly

Thanks Jake
__________________
www.aufalcon.com/jakesfalcon
Hibbz is offline   Reply With Quote Multi-Quote with this Post
Old 19-06-2007, 10:00 AM   #9
JefXR8
FF.Com.Au Hardcore
 
JefXR8's Avatar
 
Join Date: Jan 2007
Location: taree
Posts: 583
Default

Id be taking the bulge to a panel beater mate and get them to fit it! or it will look really cheap just stuck on and spoil the car.
JefXR8 is offline   Reply With Quote Multi-Quote with this Post
Old 19-06-2007, 10:52 AM   #10
svo347
AFF's 1st DM.......
 
svo347's Avatar
 
Join Date: Dec 2004
Location: Wha???... There is only 2 states 2 be in.. WA or Drunk..
Posts: 6,200
Default

Quote:
Originally Posted by au3xr6
if it's fibreglass the sun won't make it bend to shape sorry for the chemistry lesson but i thought it best to explain why you cant reform the shape of fiberglass. There are 2 main types of plastic thhermoplastic and thermosetting plastic. Thermoplastic can be moulded with heat and even melted over and over again where thermosetting plastic is shaped and then cured in some cases with heat but in the case of the epoxy used in fibreglass by a chemical reaction. once cured heat will not change the shape significantly you can cut it or break it but you can't reform it. it is for this reason that OEM bumpers are not made of fiberglass they are made of a thermoplastic which can be welded and reformed after a collision this makes them vastly superior to the fiberglass bars you can get. one decent knock and they're stuffed i recently dinged my front bar and poped it back into shape
Thanx for the chem 101 lesson mate
__________________
FORD GIVING POWER TO THE PEOPLE
Alloy headed 347ci EDXR8
13.21 @107.7mph
Quote:
Originally Posted by zetec
I know what lengths they go to to ensure it's more than just a Ford sticker on the part. Ford doesn't throw it's name on anything for a quick buck.
06 Turbo Terri AWD 6 sp in Neo with stuff i didnt even need, side steps,15.2 inch roof mounted DVD,Pioneer $tezza,Selby 30/18mm swaybars,debunged,100 cpsi Ballistic cat,Plazmaman under battery Cai injectors 14/lb boost,ZF tuned,Xtreme's magic. :
svo347 is offline   Reply With Quote Multi-Quote with this Post
Old 19-06-2007, 01:29 PM   #11
FGII-XR6
FF.Com.Au Hardcore
 
FGII-XR6's Avatar
 
Join Date: Aug 2006
Location: Salamander Bay
Posts: 5,427
Default

Quote:
Originally Posted by Hibbz
Im not sure about that because when i fitted my bodykit the rear bar flared out on one side by about 100mm so i got me old man to heat it up and i pushed it back to were i wanted it then held it while my dad cooled it with some water. It worked perfectly.
you'll find your body kit is plastic (some of the better ones are) not fibreglass it's just not in the nature of fiberglass to be reformed once cured
Quote:
Originally Posted by svo347
Thanx for the chem 101 lesson mate
thanks for the sarcasm the reson for the detailed explaination is that too often on here when you state something someone on here with no knowledge or experience shoots you down because "his mate told him and his mate is always right" so at times I feel a detailed reason for what i say is needed. Yes I do have a reasonable knowledge of the nature of plastics and in a thread like this to not share that knowledge would be unfair to those that need to know what course of action is best. I try to keep my replies as accurate as possible so as not to lead someone on the wrong path is that so bad?

Last edited by FGII-XR6; 19-06-2007 at 01:34 PM.
FGII-XR6 is offline   Reply With Quote Multi-Quote with this Post
Old 19-06-2007, 01:37 PM   #12
svo347
AFF's 1st DM.......
 
svo347's Avatar
 
Join Date: Dec 2004
Location: Wha???... There is only 2 states 2 be in.. WA or Drunk..
Posts: 6,200
Default

not at all mate im a plastic welder/mech fitter/crane driver and do have knowledge in this area wasnt being a smarta$$ at all.. Thumbs up to you
__________________
FORD GIVING POWER TO THE PEOPLE
Alloy headed 347ci EDXR8
13.21 @107.7mph
Quote:
Originally Posted by zetec
I know what lengths they go to to ensure it's more than just a Ford sticker on the part. Ford doesn't throw it's name on anything for a quick buck.
06 Turbo Terri AWD 6 sp in Neo with stuff i didnt even need, side steps,15.2 inch roof mounted DVD,Pioneer $tezza,Selby 30/18mm swaybars,debunged,100 cpsi Ballistic cat,Plazmaman under battery Cai injectors 14/lb boost,ZF tuned,Xtreme's magic. :
svo347 is offline   Reply With Quote Multi-Quote with this Post
Old 19-06-2007, 01:41 PM   #13
StealthAu
FF.Com.Au Hardcore
 
Join Date: Sep 2006
Posts: 2,981
Default

Actually, Hibbz body kit could be fibreglass. When heated you can reshape it slightly, but after letting it cool naturally it will reform its original shape. Heating it, bending it to shape and then pouring cold water on it whilst holding it in shape will allow it to hold its shape. same applys with all thermosetting plastics, they have to be cooled rapidly to hold its new form, but if heated again and cooled at a slower rate it will return to its original shape
StealthAu is offline   Reply With Quote Multi-Quote with this Post
This user likes this post:
Old 19-06-2007, 01:47 PM   #14
FGII-XR6
FF.Com.Au Hardcore
 
FGII-XR6's Avatar
 
Join Date: Aug 2006
Location: Salamander Bay
Posts: 5,427
Default

Quote:
Originally Posted by svo347
not at all mate im a plastic welder/mech fitter/crane driver and do have knowledge in this area wasnt being a smarta$$ at all.. Thumbs up to you
sorry I missunderstood your post thanks
FGII-XR6 is offline   Reply With Quote Multi-Quote with this Post
Old 19-06-2007, 06:20 PM   #15
robbo_yobbo
Kick out tha Jams
 
robbo_yobbo's Avatar
 
Join Date: Mar 2006
Location: SA
Posts: 443
Default

Quote:
Originally Posted by JefXR8
Id be taking the bulge to a panel beater mate and get them to fit it! or it will look really cheap just stuck on and spoil the car.
I dont plan on just sticking it on and painting it for a cheap result, it will be done properly and filled out as it needs. I find its always better to ask first, as generaly, someones already done it before and simple tips and tricks that they learned in the process can make all the difference.

I find theres an element of pride you get from doing it yourself, (and a $500+ odd saving on the hip!).
I can appreciate that alot of people would preffer to get something like this done by a pro, but in reality, with a little knowledge, patience and the right tools/materials, theres not alot the pros can do that the average joe cant, and even if I do screw it up, I can afford to buy another 4 or so for a few more attempts, and still come out ahead financialy!
__________________
$416.80.......All that cash came from a new (used) car. Check your back seats!
robbo_yobbo is offline   Reply With Quote Multi-Quote with this Post
Old 19-06-2007, 06:33 PM   #16
FalKeen
FTF Car Club NSW
 
FalKeen's Avatar
 
Join Date: Dec 2004
Location: The Shire NSW
Posts: 1,791
Default

Quote:
Originally Posted by robbo_yobbo
(and a $500+ odd saving on the hip!).
i assume you are just taking into account the cost of the bulge and not all of the proper materials/epoxys to bond it properly?

there would be a couple hundred dollars in materials to bond it correctly, and then the man hours - and then - after all that work and time she may still decide to move .1 of a millimetre and crack your nice paint job destroying the whole job


if your putting this on to a BA bonnet (as i assume looking at your initial photo) you would be an idiot not to just buy a full glass bonnet in the first place
FalKeen is offline   Reply With Quote Multi-Quote with this Post
Old 19-06-2007, 06:40 PM   #17
FGII-XR6
FF.Com.Au Hardcore
 
FGII-XR6's Avatar
 
Join Date: Aug 2006
Location: Salamander Bay
Posts: 5,427
Default

that photo if i remember correctly is the one they use on ebay for a demo people mostly get these to do an AU
FGII-XR6 is offline   Reply With Quote Multi-Quote with this Post
Old 19-06-2007, 06:41 PM   #18
FalKeen
FTF Car Club NSW
 
FalKeen's Avatar
 
Join Date: Dec 2004
Location: The Shire NSW
Posts: 1,791
Default

still same principle, you can buy one already done
FalKeen is offline   Reply With Quote Multi-Quote with this Post
Old 19-06-2007, 06:47 PM   #19
robbo_yobbo
Kick out tha Jams
 
robbo_yobbo's Avatar
 
Join Date: Mar 2006
Location: SA
Posts: 443
Default

Nah the photo is from the eBay listing, its going onto an AU - yeah I was only talking about the cost of the bulge, I know the other materials cost $ too, but It was just a rough comparison.
As far as man hours go, Im not too bothered as I enjoy it, its either sink $500/$600 to the pannel beater and head down the pub for the day and sink another $200 there while its getting done, or entertain myself and save the beer money for a rainy day - lol!

As far as getting one already done, I havnt seen any steel ones, and modifying a Factory BA one is more expensive and more work, I'd like to keep my bonnet steel, and even if I were to purchase a fiberglass one already done, Im still looking at the same $ as taking the bulge to the pannelbeater to graft on anyway.

At the moment I was thinking of fiberglassing a couple of bars under the bulge and riveting it down from under the hood, and in doing so (after combining it with whatever be the right adhesive), crossing my fingers that that was enough to hold it from moving
__________________
$416.80.......All that cash came from a new (used) car. Check your back seats!

Last edited by robbo_yobbo; 19-06-2007 at 06:53 PM.
robbo_yobbo is offline   Reply With Quote Multi-Quote with this Post
Old 19-06-2007, 07:50 PM   #20
FGII-XR6
FF.Com.Au Hardcore
 
FGII-XR6's Avatar
 
Join Date: Aug 2006
Location: Salamander Bay
Posts: 5,427
Default

Quote:
Originally Posted by FalKeen
still same principle, you can buy one already done
only a low series one bonnet you can't get one for a high series or series 2/3
FGII-XR6 is offline   Reply With Quote Multi-Quote with this Post
Old 19-06-2007, 07:54 PM   #21
FGII-XR6
FF.Com.Au Hardcore
 
FGII-XR6's Avatar
 
Join Date: Aug 2006
Location: Salamander Bay
Posts: 5,427
Default

if you really want to do it yourself here is an idea use temporary poprivets to hold it down while the adhesive cures this will give you as close to a flush fit as you can get as it will clamp it tight then remove rivets and fill holes once adhesive is completly cured (don't rush removing rivets)
FGII-XR6 is offline   Reply With Quote Multi-Quote with this Post
Old 19-06-2007, 08:02 PM   #22
robbo_yobbo
Kick out tha Jams
 
robbo_yobbo's Avatar
 
Join Date: Mar 2006
Location: SA
Posts: 443
Default

Quote:
Originally Posted by au3xr6
if you really want to do it yourself here is an idea use temporary poprivets to hold it down while the adhesive cures this will give you as close to a flush fit as you can get as it will clamp it tight then remove rivets and fill holes once adhesive is completly cured (don't rush removing rivets)
Thats exactly what I thought too, cheers.

Are we all agreed on sickaflex for the actual bonding, or does anyone have any alternate suggestions?
__________________
$416.80.......All that cash came from a new (used) car. Check your back seats!
robbo_yobbo is offline   Reply With Quote Multi-Quote with this Post
Old 19-06-2007, 11:04 PM   #23
Umineko
Karasu
 
Umineko's Avatar
 
Join Date: May 2005
Location: Melbourne Vic
Posts: 208
Default

To do this properly you will need to take the bonnet back to bare metal and the area that the bulge is to be fitted with should be sanded rough, 36 grit works well, you need the surface rough if you have any hope of it staying put. the bulge should be trimmed back to just the part you want, usually I'd use double sided tape to attach sheets of 36 grit paper on the bonnet where you want it to go and after trimming the bulge roughly to fit I would slide the bulge back and forth on the paper taped to the bonnet to get as close a fit as possible. then mark the area around the bulge on the bonnet with a marker pen, remove the bulge and paint the area with fiberglass resin, replace the bulge and using 25mm strips of woven glass mat work around the edge blending the tape in, 12mm on the side of the bulge and 12 mm on the bonnet, pays to put something heavy like books on the bulge to hold it down while the resin sets, once it's cured you can just blend it with body filler and refinish the paint. it's not an easy job to do at home but not impossible... takes me back to the 70s and 80s when fibreglass add ons were all the rage
Oh and whether it can be bent by heating or not depends on the resin used in the bulge, styrene resins soften quite a bit with heat and can usually be moved slightly, epoxy resins are far more stable and unlikely to distort.
it's not easy to explain the whole process in a short message so if you want more info PM me and I'll give you my mobile number and talk you through it
Umineko is offline   Reply With Quote Multi-Quote with this Post
Old 19-06-2007, 11:55 PM   #24
robbo_yobbo
Kick out tha Jams
 
robbo_yobbo's Avatar
 
Join Date: Mar 2006
Location: SA
Posts: 443
Default

Quote:
Originally Posted by Umineko
To do this properly you will need to take the bonnet back to bare metal and the area that the bulge is to be fitted with should be sanded rough, 36 grit works well, you need the surface rough if you have any hope of it staying put. the bulge should be trimmed back to just the part you want, usually I'd use double sided tape to attach sheets of 36 grit paper on the bonnet where you want it to go and after trimming the bulge roughly to fit I would slide the bulge back and forth on the paper taped to the bonnet to get as close a fit as possible. then mark the area around the bulge on the bonnet with a marker pen, remove the bulge and paint the area with fiberglass resin, replace the bulge and using 25mm strips of woven glass mat work around the edge blending the tape in, 12mm on the side of the bulge and 12 mm on the bonnet, pays to put something heavy like books on the bulge to hold it down while the resin sets, once it's cured you can just blend it with body filler and refinish the paint. it's not an easy job to do at home but not impossible... takes me back to the 70s and 80s when fibreglass add ons were all the rage
Oh and whether it can be bent by heating or not depends on the resin used in the bulge, styrene resins soften quite a bit with heat and can usually be moved slightly, epoxy resins are far more stable and unlikely to distort.
it's not easy to explain the whole process in a short message so if you want more info PM me and I'll give you my mobile number and talk you through it
Im just a little concerned that if I cut the edges off, that there wont be enough contact area to provide a solid bond, as the underside of the bulge is hollow.

Could this work effectiveley.......
- leave the surrounding plate on the bulge
- drill 100 odd holes into the bonnet where the plate will sit,
- sand back the bonnet with super rough sandpaper
- sand the underside of the bonnet under the holes
- coat all in resin
- lay some fiberglass on the underside of the bonnet
- lay some thin fiberglass on the top side of the bonnet
(this way the fiberglass on the top of the bonnet bonds through the drill holes to the fiberglass on the bottom - hopefuly)
- then bond the fiberglass bulge to the fiberglass instead of the steel
- ad a thick strip of sickaflex for added hold around the inside of the bulge
- Fill the edges, sand the edges of the bulge and fill out so they taper down (so it looks flushmounted even though its not - hopefuly)
- prime paint and hey presto

)is there any reason as to why this wouldnt work
)could it be improved upon?
)the edge around the bulge is 200-300mm, would this even be noticable if tapered back?
)will the fiberglass resin protect the steel from rust around the drill holes like paint would
)does anything special need to be done to get fresh fiberglass to bond to the set bulge?

If you think I ask allot of questions - I do!

Thanks for the help so far.
__________________
$416.80.......All that cash came from a new (used) car. Check your back seats!
robbo_yobbo is offline   Reply With Quote Multi-Quote with this Post
Old 20-06-2007, 04:17 AM   #25
DOC
FF.Com.Au Hardcore
 
DOC's Avatar
 
Join Date: Apr 2005
Posts: 4,409
Default

Quote:
Originally Posted by robbo_yobbo
Im just a little concerned that if I cut the edges off, that there wont be enough contact area to provide a solid bond, as the underside of the bulge is hollow.
Could this work effectiveley.......
- leave the surrounding plate on the bulge
- drill 100 odd holes into the bonnet where the plate will sit,
- sand back the bonnet with super rough sandpaper
- sand the underside of the bonnet under the holes
- coat all in resin
- lay some fiberglass on the underside of the bonnet
- lay some thin fiberglass on the top side of the bonnet
(this way the fiberglass on the top of the bonnet bonds through the drill holes to the fiberglass on the bottom - hopefuly)
- then bond the fiberglass bulge to the fiberglass instead of the steel
- ad a thick strip of sickaflex for added hold around the inside of the bulge
- Fill the edges, sand the edges of the bulge and fill out so they taper down (so it looks flushmounted even though its not - hopefuly)
- prime paint and hey presto
)is there any reason as to why this wouldnt work
)could it be improved upon?
)the edge around the bulge is 200-300mm, would this even be noticable if tapered back?
)will the fiberglass resin protect the steel from rust around the drill holes like paint would
)does anything special need to be done to get fresh fiberglass to bond to the set bulge?
If you think I ask allot of questions - I do!
Thanks for the help so far.
Ok Up front i am no expert, but if you leave the outside lip then it cant look exactly like the real deal as it would be raised higher , as the top of that mould would be the flush line with the bonet.

You can go that path by sticking it all on and raising it but i would trim it down neat.

If me i would secure it from under the bulge, so to do this i would slice the bulge of ( do the sandpaper trick as mentioned.

Then before sticking it turn it upside down and build metal frame some how, that i stuck inside the bulge and had flat faces i would then stick to the bonet making it sit exactly at the right height and position.

once this was done it could be a fine bog job around the joins, sand n prime / paint

Another option would be to cut some metal from the top in the shape of the mould ( after triming but leave the underneath cross members in place, stick the bulge to the cross members the sand the top level down flat with the bonet and fill etc

just an idea and is similar to what i will be doing
DOC is offline   Reply With Quote Multi-Quote with this Post
Old 20-06-2007, 07:25 AM   #26
Bucknaked
FF.Com.Au Hardcore
 
Bucknaked's Avatar
 
Join Date: Jan 2005
Location: ACT
Posts: 11,647
Default

See a panel beater. If you damage the bonnet, then your up for repairs to that as well.
Bucknaked is offline   Reply With Quote Multi-Quote with this Post
Old 20-06-2007, 07:50 PM   #27
Umineko
Karasu
 
Umineko's Avatar
 
Join Date: May 2005
Location: Melbourne Vic
Posts: 208
Default

Quote:
Originally Posted by robbo_yobbo
Im just a little concerned that if I cut the edges off, that there wont be enough contact area to provide a solid bond, as the underside of the bulge is hollow.

Could this work effectiveley.......
- leave the surrounding plate on the bulge
- drill 100 odd holes into the bonnet where the plate will sit,
- sand back the bonnet with super rough sandpaper
- sand the underside of the bonnet under the holes
- coat all in resin
- lay some fiberglass on the underside of the bonnet
- lay some thin fiberglass on the top side of the bonnet
(this way the fiberglass on the top of the bonnet bonds through the drill holes to the fiberglass on the bottom - hopefuly)
- then bond the fiberglass bulge to the fiberglass instead of the steel
- ad a thick strip of sickaflex for added hold around the inside of the bulge
- Fill the edges, sand the edges of the bulge and fill out so they taper down (so it looks flushmounted even though its not - hopefuly)
- prime paint and hey presto
.
It will certainly stick it to the bonnet but I can see a couple of problems, first while fibreglass resin is very strong when combined with fibreglass mat, used by itself (as in your resin rivet idea) it can be very brittle and will eventually crack as the bonnet flexes (which it will) secondly you'll have a lot of work to blend the whole thing in if you want it to sit flush, I have used the method I described to fit dozens of bonnet scoops over the years and have never had one let go, for added strength you could fibreglass a couple of lengths of wood inside the bulge (flush with the bottom edge) and then screw through the underside of the bonnet into the wood to hold it down, this would very effectively hold the bulge down then the edges I described earlier would reinforce this and provide a foundation to blend it onto the bonnet, drilling a hundred or so holes is not a good idea as it will only provide a hundred or so new places for rust to start, sikaflex will certainly glue the part in place but bear in mind it doesn't like paint, anything you paint on top of it will eventually crack and flake off, hope this helps
Umineko is offline   Reply With Quote Multi-Quote with this Post
Old 20-06-2007, 08:22 PM   #28
robbo_yobbo
Kick out tha Jams
 
robbo_yobbo's Avatar
 
Join Date: Mar 2006
Location: SA
Posts: 443
Default

Makes sence,

Ill give it a crack over the next few weeks as time permits and post up the results.

Cheers.
__________________
$416.80.......All that cash came from a new (used) car. Check your back seats!
robbo_yobbo is offline   Reply With Quote Multi-Quote with this Post
Old 09-11-2022, 01:43 PM   #29
spooka
Starter Motor
 
Join Date: Nov 2014
Posts: 17
Default Re: attatch a Fiberglass bulge to a Steel Bonnet??

What company did you buy the bulge from please
spooka is offline   Reply With Quote Multi-Quote with this Post
Old 09-11-2022, 01:54 PM   #30
GasoLane
Former BTIKD
Donating Member2
 
GasoLane's Avatar
 
Join Date: Mar 2005
Location: Sunny Downtown Wagga Wagga. NSW.
Posts: 53,197
Default Re: attatch a Fiberglass bulge to a Steel Bonnet??

Quote:
Originally Posted by spooka View Post
What company did you buy the bulge from please
You do realise that this thread is 15 years old and the OP hasn't been on since 2013.
__________________
Dying at your job is natures way of saying that you're in the wrong line of work.
GasoLane is offline   Reply With Quote Multi-Quote with this Post
2 users like this post:
Reply


Forum Jump


All times are GMT +11. The time now is 06:07 PM.


Powered by vBulletin® Version 3.8.5
Copyright ©2000 - 2024, Jelsoft Enterprises Ltd.
Other than what is legally copyrighted by the respective owners, this site is copyright www.fordforums.com.au
Positive SSL