
|
|

|
|
|
|
Welcome to the Australian Ford Forums forum. You are currently viewing our boards as a guest which gives you limited access to view most discussions and inserts advertising. By joining our free community you will have access to post topics, communicate privately with other members, respond to polls, upload content and access many other special features without post based advertising banners. Registration is simple and absolutely free so please, join our community today! If you have any problems with the registration process or your account login, please contact us. Please Note: All new registrations go through a manual approval queue to keep spammers out. This is checked twice each day so there will be a delay before your registration is activated. |
|
|||||||
 |
|
|
Thread Tools | Display Modes |
 27-08-2007, 10:47 AM
|
#1 | ||
|
FF.Com.Au Hardcore
Join Date: May 2007
Location: Melbourne - Eastern Suburbs
Posts: 956
|
Does anybody know where I can get some of the T-series headlights like these?
 Cheers.
__________________
2007 BF MKII XR6 CONQUER |
||

|

|
|
27-08-2007, 12:32 PM
|
#2 | |||
|
You can't stop the signal

Join Date: Nov 2005
Location: Behind a computer at work
Posts: 1,624

|
You can take the headlight apart and paint the bezel.
On base au's they were gray, on fairmonts the were chrome, on T series they were either black or body coloured. The tutorial was on the old aufalcon.com, but not yet on the new one (casper has the tut), so here it is I did mine this was and they've turned out quite well  __________________________________________________ __________________________________________________ _______________________________________ Disassemble AU headlights This tech guide will assist you in disassembling the standard AU headlights. Why would you want to do this? Most people do it so that they can paint the bezel, but it may be because you get moisture in yours and you want to fix it. AU headlight lenses are stuck in with a heat affected Silastic so you can put them in an oven to heat the Silastic to enable the lens section to be pulled from the casing. It is assumed that you have already removed the headlight from the vehicle, and removed all globes and wiring from the headlight, except for the parker globe and wiring which is integrated into the headlight unit and is not easy (and also is not necessary) to remove. Disassembly of AU Headlights 1. Preheat oven to 100 degrees Celsius. 2. Place one headlight on greaseproof paper on an oven tray and place in oven for 5 minutes 3. Remove headlight from oven and try prising the lens away from the casing. Dont try to pull the lens and the insert together - the insert is screwed in by 1 screw behind the indicator Note: If the lens will not pull away easily from the casing, put the light back in the oven for an additional 2 minutes and Repeat step 3. Continue to do this until the lens pulls away easily from the casing. I do not recommend having the lights in the oven for any more than 15 minutes, as this may lead to melting of the casing. 4. Remove the indicator lens by releasing the 3 little tags that hold it in place. You get to these from behind - use a small flat screwdriver to lift each tab while pulling slightly on the indicator lens. If you break a tab, just superglue it back on 5. Undo the screw holding the chrome/silver insert (the screw is located behind the indicator lens that you just removed). Preparing & Painting the Insert/Bezel 1. Clean the chrome from the bezel using a scourer, sandpaper, or use Wax & Grease Remover and a rag & rub hard 2. Wash the insert with warm soapy water. Rinse thoroughly and allow to dry. 3. Prime the insert well using a quality acrylic primer (MotorPro, Holts, Power Plus and Series 500 are all reasonably good brands) Note 1: Plastic Primer is not required. Note 2: If you use engine enamel or brake/calliper paint, there is no need to prime at all. 4. Once the primer has dried, use whatever colour topcoat you want. Matt or gloss colours are fine, though Matt finish tends to look better. There is no need to spray a clear-coat on top of the colour-coat. Cleaning/drying water from the lens 1. Let the lens cool after you get them apart 2. Use a mist type spray bottle (something like the armour-all bottles filled with clean water) and spray the reflector and the inside of the lens. 3. Using some really soft tissues, gently wipe the lens and/or reflector in straight lines. Do NOT rub or you will scratch the lens. (Kleenex is a suitable brand - make sure to get the plain ones as the Aloe Vera ones leave an oily smear on the lens). 4. Before you re-assemble the light put the lens and the body/reflector in the oven again for about 5 minutes to make sure to completely dry them out. Re-assembly of AU Headlights 1. Refit the (painted) insert and secure it in position with the screw. 2. Refit the indicator lens by pushing it slowly and carefully into position (you don?t want to scratch your new paint) 3. Squirt a little black Silastic in the channel so the light doesn?t leak and carefully fit the lens on Note: If you use too much Silastic you will end up with a black mess. If you don?t use enough, the light will not seal properly. 4. Put the light in the oven on the same temp and wait bout 5 minutes (ish) for the Silastic to heat 5. Press the lens on fully and get some cloth or masking tape and tape the lens on "tightly" from front to back. This will ensure the lens doesn?t pop out while setting 6. Wait around 30 minutes for the Silastic to set, then remove the tape holding the lens to the casing. 7. Re-install the light globes etc and install the headlight assembly back in the car. 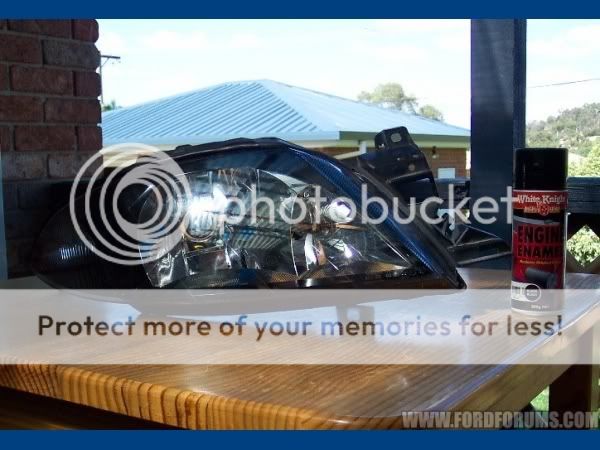 Thanks to MADNC_8 for the original method as posted on http://www.fordforums.com/ .
__________________
Quote:
|
|||
|
|
|
| 2 users like this post: |
|
27-08-2007, 07:15 PM
|
#3 | ||
|
Miami Pilot
 
Join Date: Jan 2005
Location: ACT
Posts: 21,701
|
I recognise that article, and especially the photo of my headlight on the back table. But yes, without MADNC_8, the article would not exist.
__________________
-----------------------------------------------------------------
The Hammer: FG GTE | 376rwkw | 1/4 mile 11.793 @ 119.75mph 1.733 60' (4408lb) 1 of 60 FG MK1 335 GTEs (1 of 118 FG Mk 1 & 2 335 GTEs). Mods: Tune, HSD/ShockWorks, black GT335 19 staggered replicas with 245 & 275/35/19 Michelin Pilot sport 5s Daily: BF2 Fairmont Ghia I6 ZF, machine face GT335 19 staggered Replicas with 245s and 275s, Bilsteins & Kings FPV 335 build stats: <click here> Ford Performance Club ACT |
||
|
|
|
| This user likes this post: |
|
27-08-2007, 07:27 PM
|
#4 | |||
|
windsor user
Join Date: Dec 2004
Location: Geelong
Posts: 13,123
|
Quote:
 : :
|
|||
|
|
|
|
27-08-2007, 08:28 PM
|
#5 | ||
|
FF.Com.Au Hardcore

Join Date: Jan 2005
Posts: 3,918
|
They look good body colour like au1/2 T series as well. Tibbo and myself did it to my old car.

|
||
|
|
|
|
27-08-2007, 10:00 PM
|
#6 | ||
|
FF.Com.Au Hardcore
Join Date: May 2007
Location: Melbourne - Eastern Suburbs
Posts: 956
|
I don't know if I can be bothered doing it! Plus my old lights have had it.
So there is no way to buy them these days?
__________________
2007 BF MKII XR6 CONQUER |
||
|
|
|
|
27-08-2007, 10:35 PM
|
#7 | |||
|
Miami Pilot
Join Date: Jan 2005
Location: ACT
Posts: 21,701
|
Quote:
__________________
-----------------------------------------------------------------
The Hammer: FG GTE | 376rwkw | 1/4 mile 11.793 @ 119.75mph 1.733 60' (4408lb) 1 of 60 FG MK1 335 GTEs (1 of 118 FG Mk 1 & 2 335 GTEs). Mods: Tune, HSD/ShockWorks, black GT335 19 staggered replicas with 245 & 275/35/19 Michelin Pilot sport 5s Daily: BF2 Fairmont Ghia I6 ZF, machine face GT335 19 staggered Replicas with 245s and 275s, Bilsteins & Kings FPV 335 build stats: <click here> Ford Performance Club ACT |
|||
|
|
|
|
27-08-2007, 11:30 PM
|
#8 | ||
|
Regular Member

Join Date: Feb 2006
Location: Central Coast
Posts: 252
|
Try here: http://theheadlighthospital.com.au/
__________________
Lightning Strike 09 G6E TURBO Shockworks Coilovers - Inovit Speedys - Streetfighter Intake
|
||
|
|
|
|
28-08-2007, 12:11 PM
|
#9 | ||
|
Regular Member
Join Date: Jun 2007
Posts: 34
|
is that tute process the same for the LWB lights too to get the T series look?
|
||
|
|
|
|
28-08-2007, 02:57 PM
|
#10 | |||
|
FF.Com.Au Hardcore
Join Date: Jan 2005
Posts: 3,918
|
Quote:
|
|||
|
|
|
|
28-08-2007, 06:21 PM
|
#11 | ||
|
windsor user
Join Date: Dec 2004
Location: Geelong
Posts: 13,123
|
in a fassion yes........there are 2 screws at the grill end of the light.....
they're a PITA to get apart without getting sealant everywhere, though if you're painting the inserts it wont matter so much.... use some prepsol or similar to get the sealant off the trims, "only when they've cooled down" be VERY careful removing the clear lenses on the indicators as they break rather easily.. there are 2 of them on the fairlanes..... there are 2 more screws under the seccond clear lens you'll have to remove the glass lenses from the trim over the low and high beam lights.......be careful with the clinps as you'll need to re-use these, also again be careful not to break or scratch the glass. they're a pain to reseal....use a little more sealant than you'd use on a falcon, when putting them together, tape is your best friend to make sure you get them to go together they're a lot more involved than the falcon ones, but are still a nice touch on a modded car and are well worth doing |
||
|
|
|
|
09-09-2007, 08:30 PM
|
#12 | ||
|
windsor user
Join Date: Dec 2004
Location: Geelong
Posts: 13,123
|
^^was that of any help?^^
|
||
|
|
|
|
11-04-2016, 12:25 PM
|
#13 | ||
|
Regular Member

Join Date: May 2007
Location: Melbourne
Posts: 103
|
Ugh I'm going to attempt this on my series 1 Fairlane Ghia.
Trouble is, my oven isn't big enough haha!! |
||
|
|
|
|
11-04-2016, 01:50 PM
|
#14 | ||
|
Irregular member

Join Date: Dec 2004
Location: Melbourne
Posts: 3,941

|
This thread is 8 years old but I also plan to do it one day (colour code to grey).
__________________
2000 AU II FAIRLANE 75th ANNIVERSARY - big and shiny My hovercraft is full of eels! Movie Car Chase of the Week: Gene Hackman driving a 1971 Pontiac LeMans to chase an elevated train in The French Connection (1971). |
||
|
|
|
| This user likes this post: |
|
11-04-2016, 06:41 PM
|
#15 | |||
|
Next upgraded Mk1 Leopard
  
Join Date: Jan 2005
Location: Sydney, in the burbs
Posts: 4,908
|
Quote:
1. Use you BBQ if its big enough or go to a mates place that has one (mine was only a 3 burner) or 2. Use a hair dryer and flat head screw driver. Heat near a corner and work your way around levering out with the screw driver. Once you get it started use another one to keep the pressure on. Do it slowly so u dont wreak the plastic. UK
__________________
Plastic Surgery 1 AUII Monsoon Blue How 2's: Change rear view mirror, Install backfire valve, Change foam front seats, Install auto transmission cooler, Replace Trans Shift Globe, Remove front door Trim, Paint AU headlights, install door spears, Premium Rear Parcel Shelf, go here...
 |
|||
|
|
|
|
11-04-2016, 09:23 PM
|
#16 | ||
|
Regular Member
Join Date: May 2007
Location: Melbourne
Posts: 103
|
Thanks mate I like the hair-dryer idea. I was going to pinch a mate's heat gun. Our maybe his oven lol.
Cheers! |
||
|
|
|
|
11-04-2016, 09:29 PM
|
#18 | |||
|
Miami Pilot
Join Date: Jan 2005
Location: ACT
Posts: 21,701
|
Quote:
__________________
-----------------------------------------------------------------
The Hammer: FG GTE | 376rwkw | 1/4 mile 11.793 @ 119.75mph 1.733 60' (4408lb) 1 of 60 FG MK1 335 GTEs (1 of 118 FG Mk 1 & 2 335 GTEs). Mods: Tune, HSD/ShockWorks, black GT335 19 staggered replicas with 245 & 275/35/19 Michelin Pilot sport 5s Daily: BF2 Fairmont Ghia I6 ZF, machine face GT335 19 staggered Replicas with 245s and 275s, Bilsteins & Kings FPV 335 build stats: <click here> Ford Performance Club ACT |
|||
|
|
|
| This user likes this post: |
|
11-04-2016, 09:58 PM
|
#19 | ||
|
Regular Member
Join Date: May 2007
Location: Melbourne
Posts: 103
|
Yep. They're quite large when removed. Lucky wifey didn't catch me with car parts in the oven. She went sideways when I put bmx parts in the dishwasher haha ��!!!
|
||
|
|
|
| This user likes this post: |
|
11-04-2016, 10:00 PM
|
#20 | ||
|
Miami Pilot
Join Date: Jan 2005
Location: ACT
Posts: 21,701
|
Just make sure they don't touch the sides or the door, back etc - the plastic will melt and it will stick to the oven. You need them on a tray on greaseproof paper.
__________________
-----------------------------------------------------------------
The Hammer: FG GTE | 376rwkw | 1/4 mile 11.793 @ 119.75mph 1.733 60' (4408lb) 1 of 60 FG MK1 335 GTEs (1 of 118 FG Mk 1 & 2 335 GTEs). Mods: Tune, HSD/ShockWorks, black GT335 19 staggered replicas with 245 & 275/35/19 Michelin Pilot sport 5s Daily: BF2 Fairmont Ghia I6 ZF, machine face GT335 19 staggered Replicas with 245s and 275s, Bilsteins & Kings FPV 335 build stats: <click here> Ford Performance Club ACT |
||
|
|
|
|
12-04-2016, 01:22 PM
|
#21 | ||
|
Next upgraded Mk1 Leopard
Join Date: Jan 2005
Location: Sydney, in the burbs
Posts: 4,908
|
JC (as always) is correct be carffull
Here is the link to the How To I did (built on from that MADNC_8 and JC had done) http://www.fordforums.com.au/vbporta...articleid=1250 UK
__________________
Plastic Surgery 1 AUII Monsoon Blue How 2's: Change rear view mirror, Install backfire valve, Change foam front seats, Install auto transmission cooler, Replace Trans Shift Globe, Remove front door Trim, Paint AU headlights, install door spears, Premium Rear Parcel Shelf, go here...
|
||
|
|
|
| This user likes this post: |
|
28-04-2016, 12:00 PM
|
#22 | ||
|
CNC fixer guy

Join Date: Sep 2006
Location: Melbourne Vic
Posts: 609
|
Hi guys,
UK's post is pretty good, but I will add my 2 cents... I pulled apart my lights a couple of years ago using a paint strip gun and screw drivers to pry it apart. Keep moving the gun on low around the seal joint to heat evenly on some carpet or non scratch surface while wearing gloves as the goo is messy . Keep prep wash or similar handy to clean the goo up as it gets stringy like mozzarella cheese from a slice of hot pizza  . .Don't re-seal with Silicon or Sika Flex as you may not be able to open it again, I used Butyl rubber so I could heat it again to re-open and have not had any leaks or condensation. You can get it in a cartridge at Bunnings. The chrome on the bezel flakes off when touched, just fine sand or scotch bright it, engine enamel black works well as you don't need a primer. I also agree that matt or satin is best for this application. For assembly, use a little even heat all round and elec tape to hold together until it all cools. I am considering repainting mine from black to light or dark grey metallic and fitting DRL's in there somewhere in the future. Good luck, Andrew.
__________________
Weekend Toy: S1 AU Fairlane V8 with LTD bits, Tickford 17" wheels, front and rear chin spoilers, series 2 front brake conversion with Super pro bushes, Pacemaker headers, rear muffler removed, Kings/Pedders lowered suspension, Koni adj rears, painted headlight bezels, HR 2300kg hitch, 2 stage shift kit, trans cooler, reverse cam and media player. Wife unit's : 2010 update FG XR6, reverse cam, HR 2300kg Hitch, German Maestro speakers, parcel shelf sub, trimmed mudflaps, batman stickers. |
||
|
|
|
| This user likes this post: |
|
24-05-2016, 02:00 PM
|
#23 | ||
|
T-Series Club Member Vic

Join Date: Aug 2011
Location: Melbourne (South-East)
Posts: 2,755
|
If you're oven is big enough, placing the assembly on wood is a good idea.
Heat gun works quite well, though I'm considering making a redneck oven out of a box and my heat gun (it is variable temp and goes down to 100 celcius) to see if that helps. |
||
|
|
|
|
07-06-2016, 09:28 AM
|
#24 | ||
|
Regular Member
Join Date: Aug 2008
Location: Melbourne
Posts: 51
|
I have contemplated replacing the headlights on my LTD but I am not sure they are still available. They have become a bit foggy and one of them has a brown tinge to it. makes the whole car look crappy. It has a list of problems that will cost as much as the car is worth to fix, but it is straight, comfortable and has a strong 302 that runs on LPG.
__________________
AU I LTD V8 Sleeper AU II XR8 220kw SVO zorst, G&D Auto |
||
|
|
|
|
07-06-2016, 10:36 AM
|
#25 | ||
|
T-Series Club Member Vic
Join Date: Aug 2011
Location: Melbourne (South-East)
Posts: 2,755
|
The headlight refurbishing kits might be a better bet for you? The results are always surprisingly good.
|
||
|
|
|
| This user likes this post: |


 Linear Mode
